How To Enable HTTPS for Blogger Custom Domain The Easy Way, No Need For CloudFlare
I've just discovered a really simple way to enable HTTPS on a Blogger or Blogspot Blog with a Custom Domain name -- and what's great is that it doesn't involve the use of CloudFlare or any other third party service provider.
If you've long been looking for a solution to this (like I was), I'm sure you'd be surprised at how easy it is to accomplish. Here's how you do it:
1. Log-in to your Blogger / Blogspot account.
2. Go to Settings.
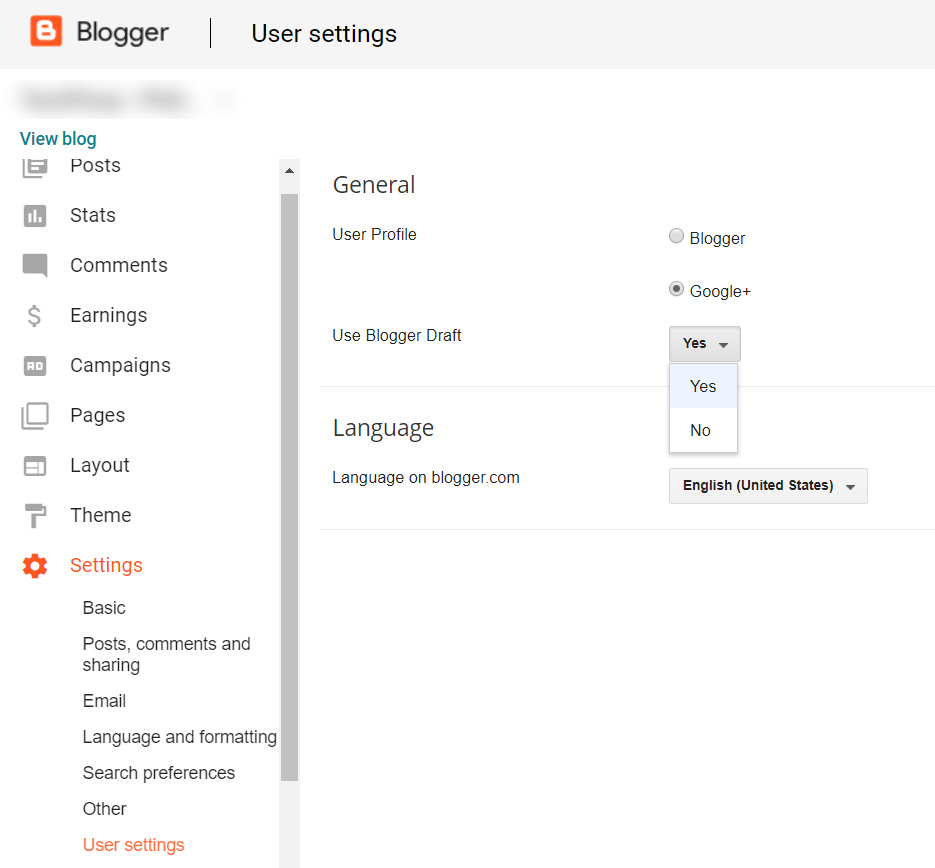
3. Under Settings, Click on "User settings".
4. Turn on Blogger Draft by clicking on the drop-down menu and choosing "Yes".
5. Save Changes.

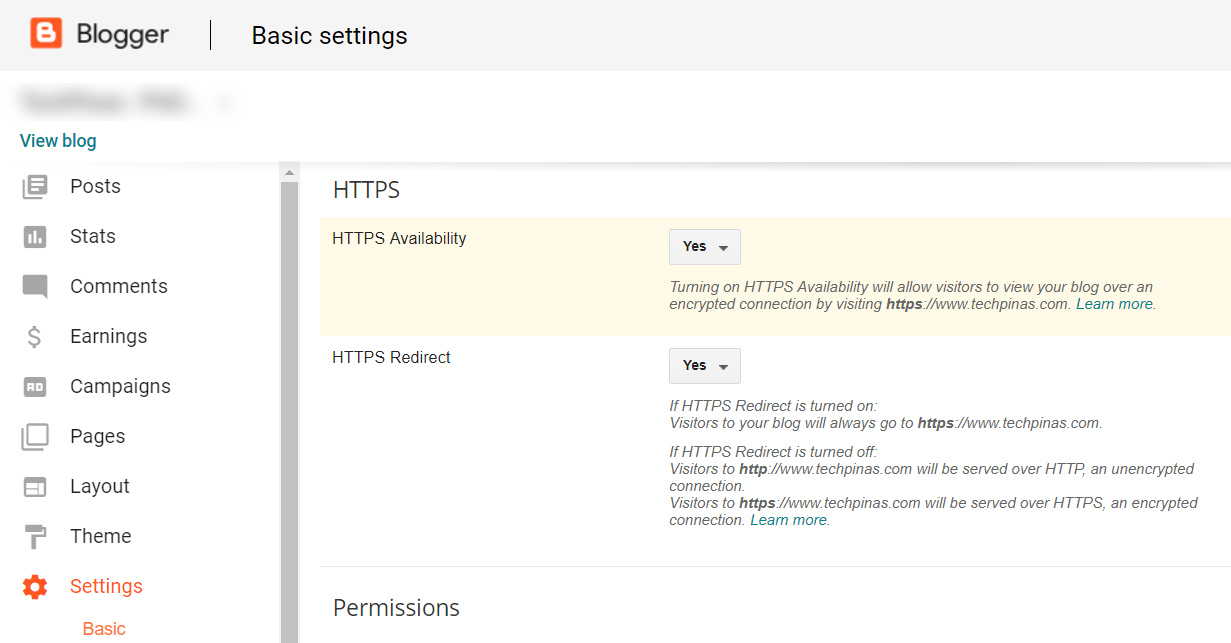
6. After the change has taken effect, go to "Basic" under the Settings.
7. Scroll down and turn on HTTPS Availability by clicking on the drop-down menu and choosing 'Yes'. Save changes again.
8. Wait a few minutes and refresh the page.
9. When the HTTPS Redirect section becomes activated, turn it on by clicking on the menu and choosing 'Yes'.
10. Wait a few minutes then try if HTTPS Redirect has been activated on your blog's website address.

See? It's totally easy, right? With HTTPS finally turned on, your blog will become more secure and SEO-friendly. It's all good.
I can't believe Blogger has had this for so long but so few publishers on the site actually know it. I think the Team could have done more to spread the information. I mean, I hardly see any official article from Google about this feature.
Anyway, if you found this post useful don't forget to share it with your friends and to follow TechPinas on social media. I'd appreciate it! Thanks!
If you've long been looking for a solution to this (like I was), I'm sure you'd be surprised at how easy it is to accomplish. Here's how you do it:
1. Log-in to your Blogger / Blogspot account.
2. Go to Settings.
3. Under Settings, Click on "User settings".
4. Turn on Blogger Draft by clicking on the drop-down menu and choosing "Yes".
5. Save Changes.

6. After the change has taken effect, go to "Basic" under the Settings.
7. Scroll down and turn on HTTPS Availability by clicking on the drop-down menu and choosing 'Yes'. Save changes again.
8. Wait a few minutes and refresh the page.
9. When the HTTPS Redirect section becomes activated, turn it on by clicking on the menu and choosing 'Yes'.
10. Wait a few minutes then try if HTTPS Redirect has been activated on your blog's website address.

See? It's totally easy, right? With HTTPS finally turned on, your blog will become more secure and SEO-friendly. It's all good.
I can't believe Blogger has had this for so long but so few publishers on the site actually know it. I think the Team could have done more to spread the information. I mean, I hardly see any official article from Google about this feature.
Anyway, if you found this post useful don't forget to share it with your friends and to follow TechPinas on social media. I'd appreciate it! Thanks!


